Open Your Blocked Account in Minutes
Skip the paperwork and delays. With Fintiba, you can open your German blocked account instantly, transfer funds safely, and receive your blocking confirmation recognised by German embassies worldwide.
Your visa also requires health insurance. Fintiba Plus adds the right coverage to your Blocked Account in the same step, no second provider, fully covered before your appointment.


What Is a Blocked Account in Germany?
A Blocked Account is a special bank account that required by German authorities as proof that you have sufficient financial means to support yourself during your stay in Germany. It is a mandatory requirement for many visa applicants, including:
International students
Job seekers and Chancenkarte applicants
Language course participants
Apprentices and vocational training students
Au-pairs
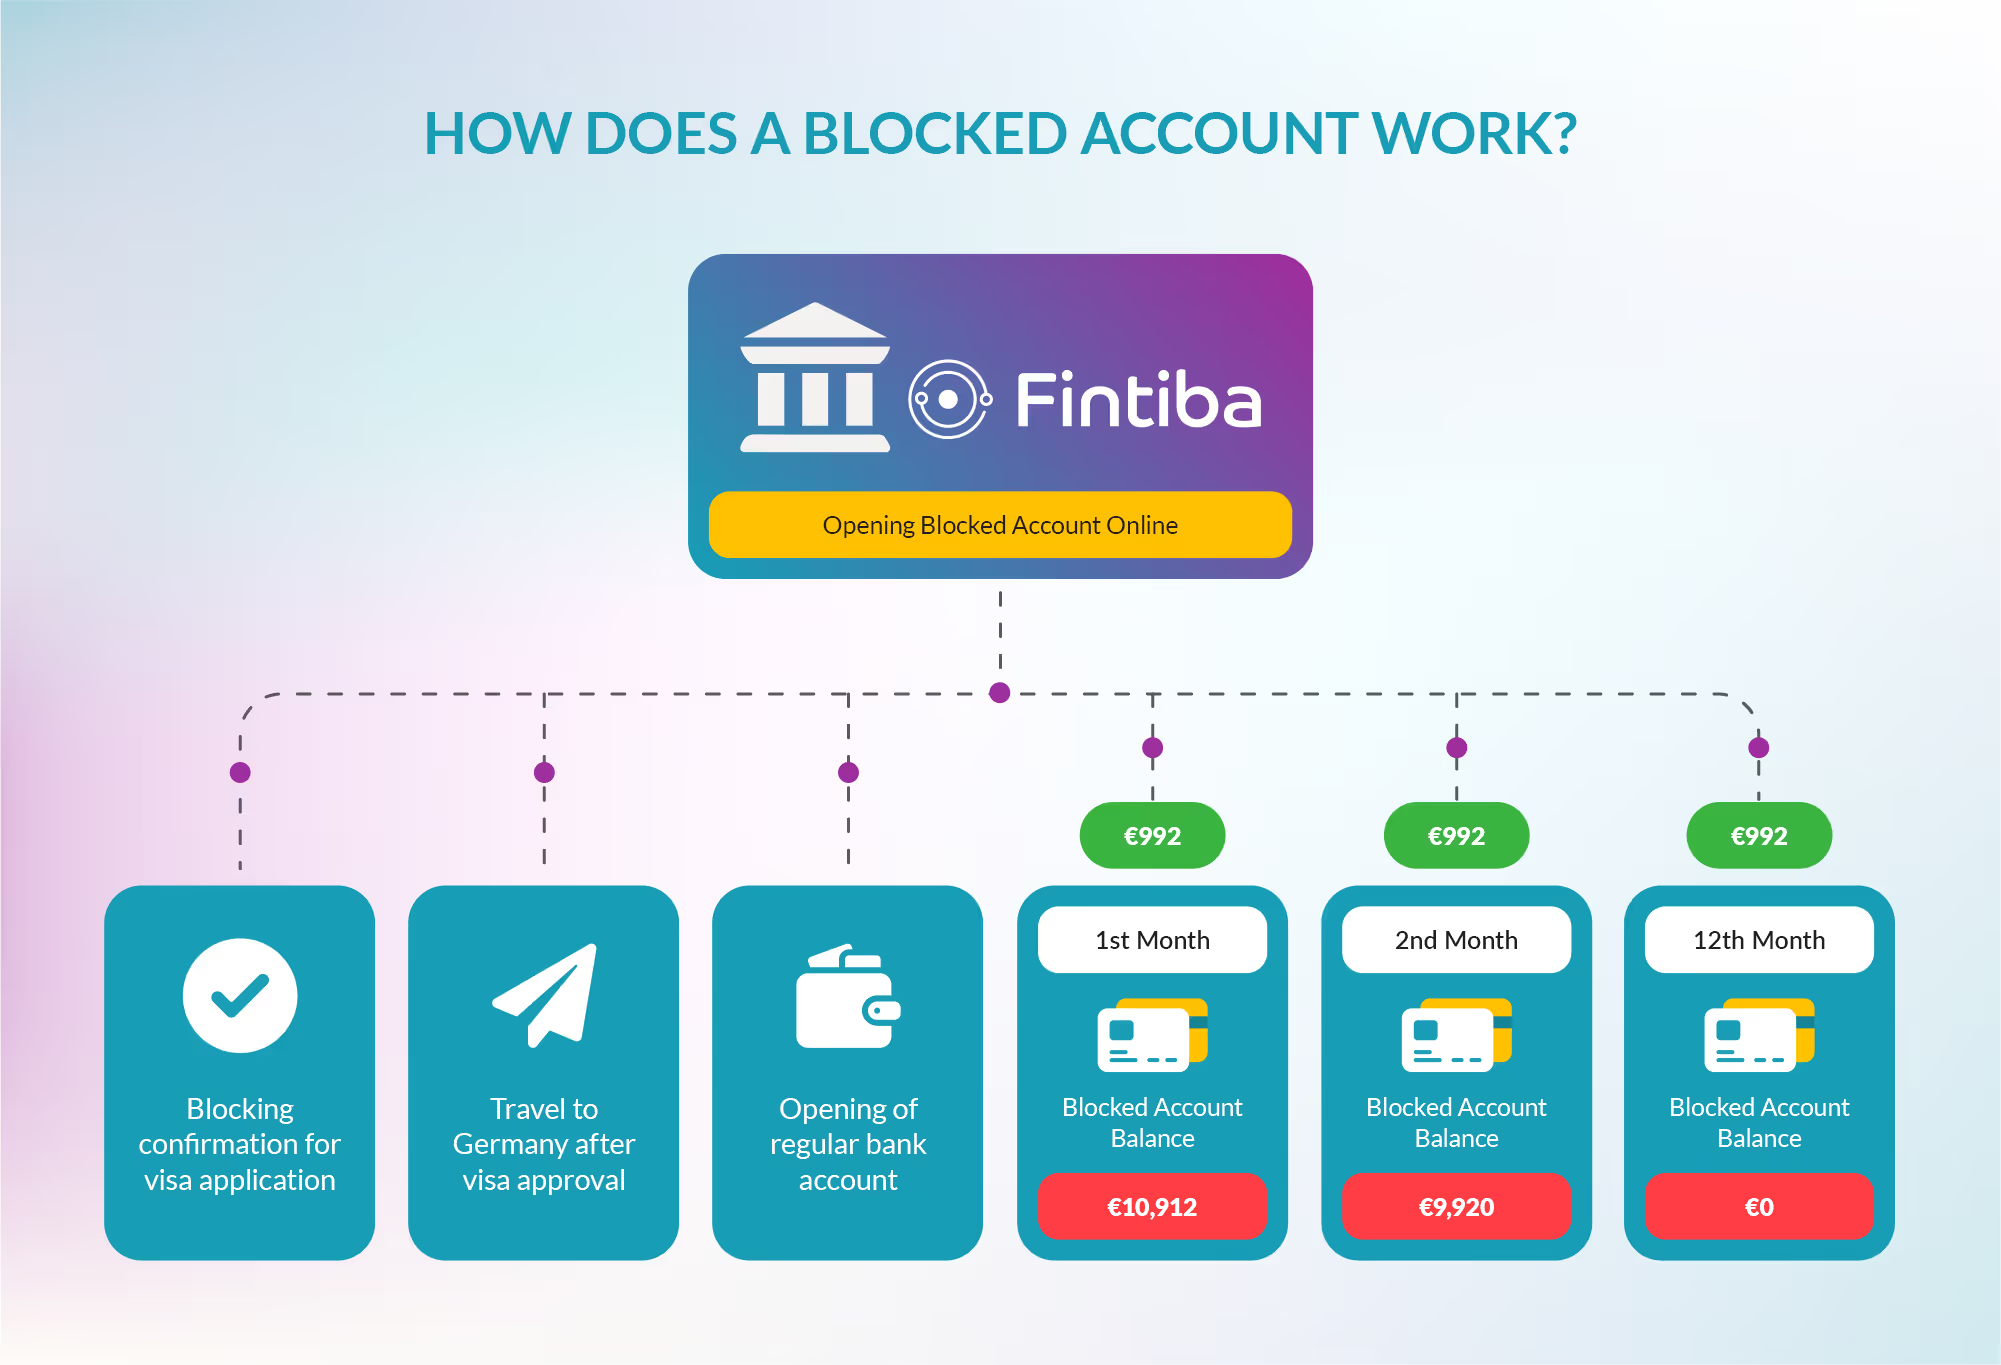
As the name suggests, the money in the account will be "blocked" until you arrive in Germany. After arriving in Germany, a standard monthly sum will be transferred to you German bank account for a set duration of time.
Why You Should Get Your Blocked Account and Health Insurance With Fintiba
Fintiba is a leading provider supporting more than 300,000 internationals on their journey to Germany. Fintiba makes the process fast, easy and reliable, giving you peace of mind.
Fast Account Opening
Open your account 100% online and enjoy a smooth experience. Most accounts are ready within minutes.
Secure & Reliable
Your funds are protected by the German deposit guarantee scheme, offering you complete security.
Instant Confirmation
Receive your blocking confirmation instantly with a credit card payment and be ready for your visa appointment.

Accepted for Your Visa
Our Blocked Account and Health Insurance are accepted by all German embassies, ensuring your application is hassle-free.
Customised Package
Answer a few questions and get a customised package tailored exactly to your situation.
Coverage From Day One
Includes your Blocked Account, Health Insurance and free Travel Insurance, covering you from your visa to your stay.
What Our Customers Think About Our Blocked Account:
How to Open Your Blocked Account for Germany
Opening a Blocked Account with Fintiba is a smooth process designed to help you secure your German visa. Follow these simple steps and ensure a hassle-free experience.
1. Register Online
Register online to start your Blocked Account opening process with Fintiba in just a few minutes. The only document you need is your valid passport.
2. Transfer Your Funds
After your account is opened, transfer the required amount. Fintiba Transfer offers fast and affordable transactions.
3. Receive Confirmation
Once we receive the funds, your blocking confirmation will be available in your Fintiba App. Download this for your visa appointment.
4. Open A Bank Account
After arriving in Germany, open a bank account and connect it to your Blocked Account to receive your monthly payouts.
When to Open Your Blocked Account
We recommend opening your Blocked Account around 3-4 weeks before your visa appointment. This gives you enough time to setup your account, transfer your money, and receive your confirmation without last-minute stress.
If you need to deposit the funds through an international bank transfer, it is especially important to start the process early. These transfers can take up to two weeks.
Fintiba Transfer offers a faster and more efficient alternative. Your funds typically arrive in your Blocked Account within 2-4 business days, saving you a lot of time. And if you pay by credit card, you’ll receive your blocking confirmation instantly, saving you even more time.
What Is the Required Blocked Account Amount for Germany in 2025?
The Blocked Account amount for Germany is the minimum sum you must have to meet the financial proof required for your visa. This amount is officially defined and updated by the German government based on the estimated cost of living.
Please keep in mind that only your local German embassy or immigration office can provide you with binding information on the required blocked amount for your individual case.
For the Student Visa
For most international students, the official Blocked Account amount for Germany is €11,904 for 12 months (equivalent to €992 per month).
For the Opportunity Card
If you're applying for the Chancenkarte (Opportunity Card), the requirement is higher. You must show at least €13,092 per year (€1,091 per month).

Additionally, certain kinds of visas require a 10%-increase of the standard monthly blocked amount. This applies to the following types of visas:
- §16d AufenthG - Visa for recognition of foreign qualifications.
- §16f (1) AufenthG - Visa for language course which does not serve to prepare for studies.
- §17 AufenthG - Visa for searching for a course of study or apprenticeship.
If you plan to apply for one of the mentioned visas, please make sure to increase the monthly amount by 10%.
How Do I Access the Money from the Blocked Account in Germany?
After you arrive in Germany, you need to open a German bank account. In the Fintiba App, you will be asked to upload your visa and provide us with the IBAN of your bank account. You will also need to connect your phone number to your account, for security purposes.
Monthly Payouts
After we have your bank details, we can then transfer your monthly sum from your Blocked Account to your regular account every month.
Legitimation Process
Depending on your passport and nationality, you might have to complete an additional step before receiving payouts. This is the final legitimation in Germany. Read more about this in our Help Center.
How Much Does It Cost to Open a Blocked Account with Fintiba?
One-Time Set-Up Fee
A one-time fee of just €XX to set up your account.
Monthly Fee
A monthly administration fee of only €XX is charged after the deposit.
Transfer Fees
No international transfer fees apply when using Fintiba Transfer.
Visa Rejection Refund
Receive a refund of the blocked amount if your visa is rejected.
Explore Our Specialised Blocked Accounts
At Fintiba, we also offer flexible Blocked Account solutions for underage internationals and applicants for a Declaration of Commitment (Verpflichtungserklärung). These solutions can also include mandatory health insurance, a requirement for your visa application. No matter your situation, we make sure your account meets the legal requirements simply and securely.


FAQs
Find answers to common questions about the Blocked Account for your German visa application.
As a student, do I need a new Blocked Account for my second year of studies?
No, you do not need to open a new Blocked Account for your second year of university. According to official requirements, a blocked account is typically only mandatory for the first year of your university studies in Germany. If you stay longer, you’ll need to prove sufficient financial means again to extend your residence permit. This doesn’t always have to be through a blocked account. Alternatives like a scholarship, working student job, parental support, or a Declaration of Commitment (Verpflichtungserklärung) are also accepted.
Can I transfer more than the required amount?
Yes, you can transfer more than the required amount to your Blocked Account. However, the maximum amount you can transfer is clearly outlined on the first page of your "Transfer Information Document". You can find this document in the "Documents" section of your account once your Blocked Account is opened.
Can I use the Blocked Account to pay my monthly rent and other expenses?
You cannot use your Blocked Account to directly pay your living expenses. Additionally, please don't provide your Blocked Account details (IBAN, BIC) to your service providers, as their direct debit requests will be declined. To pay your rent and other expenses, you will need to open a German bank account and receive an IBAN. With this, you can then set up your monthly payouts from your Blocked Account to your bank account through the Fintiba App.
How do I get my money once I am in Germany?
Once you’ve arrived in Germany, you need to open a regular bank account (Girokonto) and connect it to your Blocked Account via the Fintiba App. Your monthly payout will then be transferred to your bank account. Fintiba makes the process seamless and fully digital.
How long does it take to open a Blocked Account?
Opening a Blocked Account with Fintiba takes as little as 10 minutes. However, please note that there is a difference between opening your Blocked Account (going through the registration process) and getting your blocking confirmation (the document needed for your visa application). To get your blocking confirmation, you first need to transfer the blocked amount, which on average takes between 1 to 5 business days to arrive in your Blocked Account. After the amount arrives, your blocking confirmation is then automatically issued.
How much does the Blocked Account for Germany cost?
The initial fee for the blocked account is {{price:initial_fee}} and the monthly account management fee of {{price:monthly_fee}} will follow. The payment of the monthly account administrative fees of {{price:monthly_fee}} starts as soon as the money enters your account. The fees are charged for the duration your account remains open. Therefore, only open your blocked account if you are certain that it is required for your visa application.
How much money is needed for a Blocked Account in Germany?
In 2025, the official required amount is €11,904, which equals €992 per month. If you are applying for the Opportunity Card (Chancenkarte), however, the minimum amount you need is €1,091 per month (€13,092). This amount is set by German authorities and is adjusted on a regular basis to reflect the estimated living costs for one year.
Is a Blocked Account mandatory for all visa types?
No, the Blocked Account is not mandatory for all visa types but it is the most accepted method to demonstrate proof of funds for visa types such as the student visa or Opportunity Card. In some cases, alternative proof of funds such as a Declaration of Commitment (Verpflichtungserklärung), scholarship, or confirmed income from a job are accepted.
Is it possible to extend my Fintiba Blocked Account?
Yes, a Blocked Account extension is possible. You may easily extend your Fintiba Blocked Account directly in your account. You can transfer the additional blocking sum needed for your visa or residence permit extension to your existing Blocked Account. Please note that expired or terminated accounts cannot be extended. In this case, you would need to initiate an account reopening process.
Is the Fintiba Blocked Account accepted by German embassies?
Yes, the Fintiba Blocked Account is fully compliant and is officially accepted and approved by the German Federal Foreign Office. This also means that the Fintiba Blocked Account is accepted by all German embassies and consulates worldwide as well as immigration offices all over Germany.
Is the Fintiba Blocked Account safe?
Yes. The Fintiba Blocked Account is completely safe. Your funds are held securely with a licensed German bank, and Fintiba is a trusted, long-standing provider officially recognised by German authorities.
What documents are required to open a Blocked Account?
You will only need a valid passport to open your Blocked Account with Fintiba. In some cases, additional documents may be requested depending on your nationality or visa type.
What happens if my visa gets rejected?
In the unlikely case that your visa application is rejected, don’t worry, you will receive a refund of your blocked amount with the exception of the account opening fees and any transfer fees that might have been charged.
What is a Blocked Account?
A Blocked Account is a special type of bank account required for your visa that proves you have enough funds to support yourself while living in Germany. The money is “blocked” and released in monthly installments once you arrive.
Who cannot open a Blocked Account with Fintiba?
Certain underlying banking regulations and/or international anti-money laundering regulations do not allow us to open Blocked Accounts if you fall under the following categories: People with US Tax status; Residents of North Korea (KP); Iranian nationals, except: Iranians who reside outside of Iran, and have a non-Iranian address or Iranians who obtained a visa from the German embassy in Iran with a condition to open a Blocked Account after arrival in Germany with a German address.
Why do I need a Blocked Account for Germany?
If you are applying for a German visa as an international student, job seeker, language course participant or au-pair, you need a Blocked Account to prove financial stability. It’s a key requirement for obtaining your visa and showing you can cover your living expenses in Germany.